
Things Needed:
Tube/Image of choice: I am using a tube from the talented Anna Marine which you can purchase from CDO
Kit of choice: I am using a PTU Kit from Created by Jill called Finding Neverland which you can purchase here
Plugins: Muras Meister Copies and Tramages- Tow the Line
Let’s Begin:
1. Open a new image 600 x 600 ( this we will call our working image and you can resize later if you choose to do so )
2. Open CreatedbyJill_FindingNeverland_frame4.png and resize by 80% twice
3. Copy and paste as a new layer on our working image
4. Adjust- Sharpen
5. Using your magic wand click in the center of our frame
6. Open CreatedbyJill_FindingNeverland_paper03.jpg and paste as a new layer on our working image
7. Place to your liking
8. Selections- invert
9. Hit delete on your keyboard one time
10. Select None
11. Now move this paper layer below our frame
12. Open your tube and resize if necessary
13. Paste as a new layer on your working image and place to your liking
14. Okay now we have our tube in place and the rest will fall in place “around the tube”
15. Open CreatedbyJill_FindingNeverland_framewrap2.png and resize by 50%
16. Rotate to the left “all layers”
17. Now copy and paste as a new layer on our working image
18. Now place to your liking and crop off the excess images
19. Add a nice drop shadow now to your tube and the ribbon
20. I used 0, 0, 100, 10, black
21. Open CreatedbyJill_FindingNeverland_string.png and resize by 50%
22. Copy and paste as a new layer on our working image move towards the top of our frame
23. Once happy with placement duplicate image flip and you might have to move this one a bit
24. Once content Merge the two rope layers together and send to the bottom so that it’s behind the paper and frame
25. Add a drop shadow again but change the blur to 4 instead of 10
26. Open CreatedbyJill_FindingNeverland_greenery.png and resize all layers by 40%
27. Image rotate by 90 degrees to the left all layers
28. Copy and paste as a new layer on our working image
29. Move around and place to your liking (you will have to duplicate to have it coming from more than one area) look at my tag for placements, but again it depends which tube you use.
30. Add a nice drop shadow to the greenery
31. From here I will let you choose what other little elements you add; I added flower 2 in a couple spots
32. Okay are we ready to move on?
33. Okay merge all layers visible
34. Duplicate this layer
35. Highlight the bottom layer
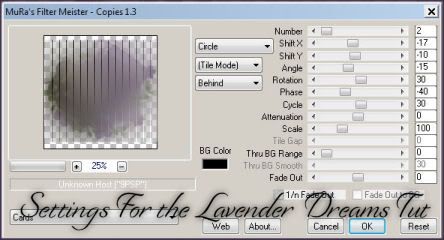
36. Open your Muras Meister Copies with these settings :
37. Now lower the opacity between 30 to 40
38. Apply Tramages- Tow the line with the settings of :
Control 0: 24
Control 1: 54
Control 2: 48
Control 3: 9
39. Open CreatedbyJill_FindingNeverland_petals.png and resize by 75% twice
40. Now paste as a new layer and place to your liking BETWEEN the two layers
41. Add a nice drop shadow once again
42. Merge all layers visible once again
43. Resize now if you choose to do so
44. Add your text and of course add your copyrights
That’s it we are done with this tag. I hope that you like your results and I would personally love to see your results if you wouldn’t mind sending them to me I will even put them on my blog!! My email is theycallmetig@yahoo.com so don’t be shy share your results!!!
No comments:
Post a Comment